⚙️ Advanced Configuration#
The following best practices should be implemented based on your specific requirements once your bot has been fully developed and is ready for deployment.
If you come from 🚀 Quickstart section you set up a development environment with a daemon running locally with exposed ports, a manually started bot, … When your bot is ready to be passed into production there are different steps you will need to implements, depending on your use case. You might have a look to the following sections and select which one is relevant for your use case.
Danger
Before proceeding with your reading, please carefully consider the following points.
The daemon is an extremely sensitive entity that can access and/or store the content of your exchanges, attachments, etc. Ensure that its accesses and hosting are properly secured.
Traffic between your bot and the daemon is not encrypted if you did not set up TLS. It should never be exposed under any circumstances.
Similarly, without TLS, the concept of a client key only serves to compartment usage and cannot be used for authentication purposes in any way.
Create a Bot in Keycloak#
Note
This section is only for people with an Olvid Keycloak deployed 😬.
If you’re unsure about what this means, don’t hesitate to click 👉️ here 👈️ to learn more about this premium feature !
Setting up a Keycloak Bot enables you to manage it as one of your standard Keycloak users. It can be added and removed from groups, and users can interact with the bot through the directory tab in their application. This significantly facilitates its integration and utilization at medium and large scales.
The following steps requires access to the Olvid Management Console within your Keycloak.
Enable bots in keycloak#
Tip
This step is only necessary for your first bot.
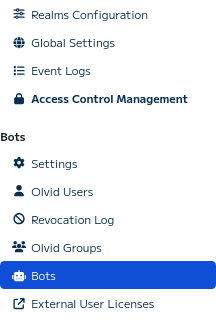
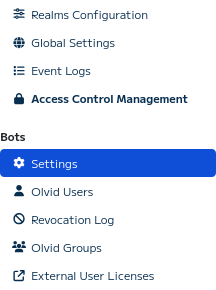
For your realm if you cannot see the Bots button in the left sidebar, click on your realm Settings button.
Bot button
Realm Settings button
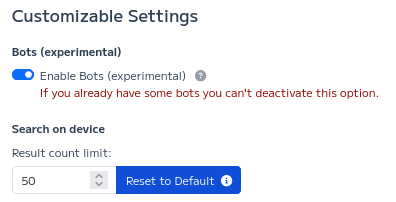
Then, in your realm settings switch on Enable Bots option.
Enable bots
Create a new Keycloak Bot#
Go to your Realm Bots page. The button is in the left sidepanel.
Bots button

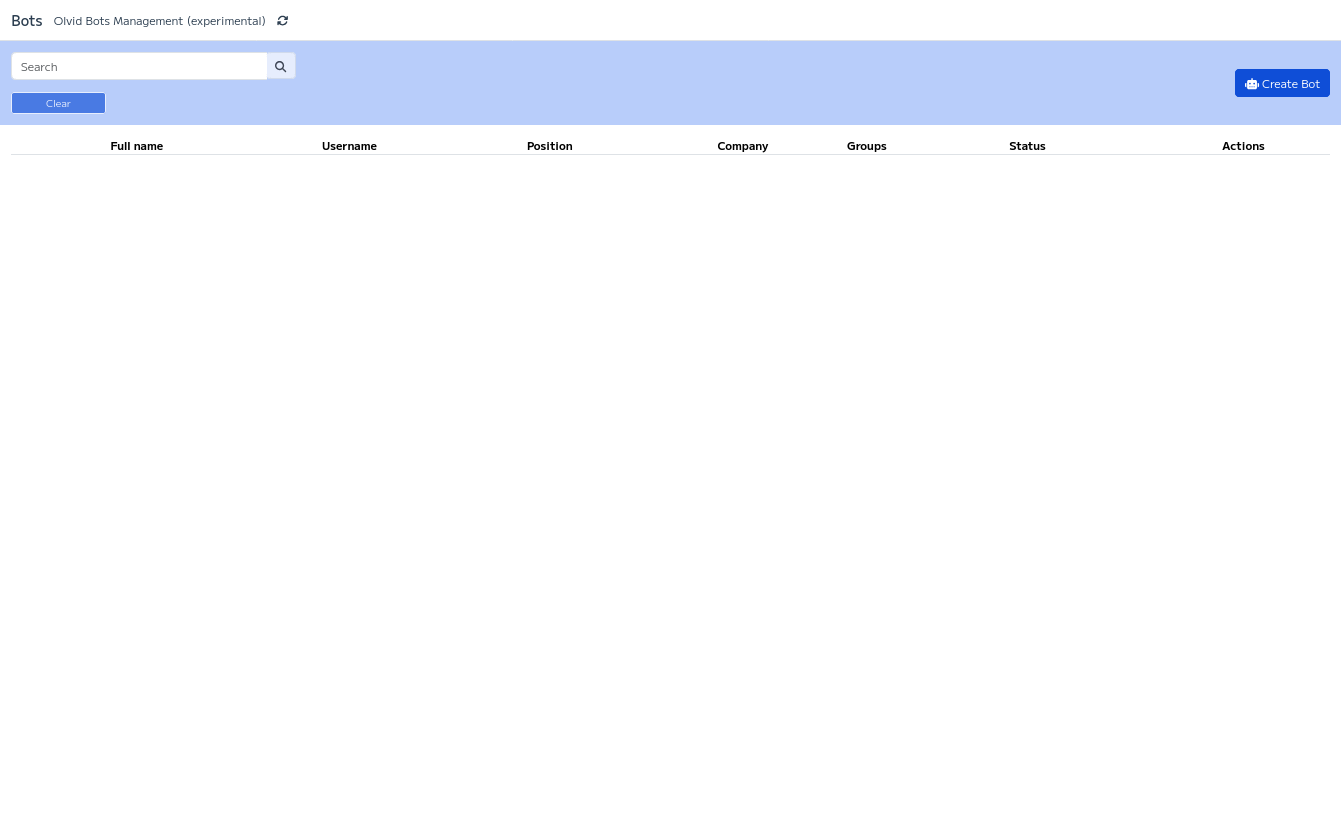
When in your Bots Management Page, click on the Create Bot button in the upper-left corner.
Bot Management Page
This will show you a form to fill with your new bot username and identity details.
Bot Creation Form
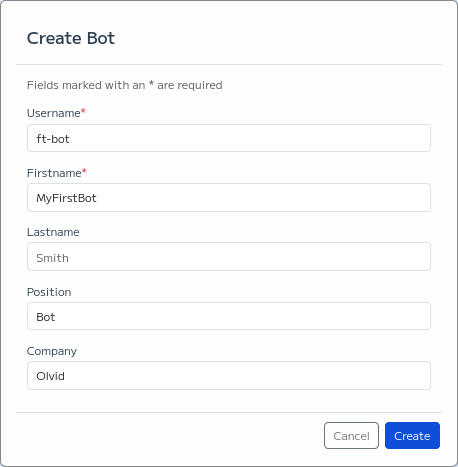
When you validated the form a configuration link (starting with https://configuration.olvid.io/#) will be shown. Save this link for the next steps.
Tip
If you lost your configuration link you can reset it with the refresh button in your bots list.
Create your bot identity#
When you have your configuration link you will need to use CLI. Click here` if you don’t remember how to use it.
Create a new keycloak identity
Start CLI, and create your new identity using your configuratin link. It will automatically generate a client key to pass to your future bot.
# create your identity
0 > identity kc new https://configuration.olvid.io/#AAAAAAAAA.....
# a client key is automatically created
identity creation > Here is your client key to connect to daemon with this identity: 00000000-0000-0000-0000-000000000000
# save your client key and say yes to finish
identity creation > Did you saved your client key ? (y/N)
> yes
Bind an existing keycloak identity to a keycloak
If you already have an identity to your bot you can use the identity kc bind command to link it to your new Keycloak bot.
It will register your bot on keycloak, and update it’s Identity Details to feat the details you just set up in Keycloak.
Start CLI, choose your current identity (probably 1 if you only have one identity on your daemon), then bind it to keycloak using your configuration link
1 > identity current 1
1 > identity kc bind https://configuration.olvid.io/#AAAAAAAAA.....
Every Keycloak user can now discover and interact with your bot through their Directory within the Olvid application.
You can also manage your bot from your Administration Console! 🎉
Containerize Bot#
When developing and testing your application, it’s usually more convenient to use your local Python installation and a daemon container exposed to your host system. However, for a stable environment in production, we recommend to containerize your bot application.
There are three ways to achieve this:
Run with python-runner: Use python-runner docker image to run your code. (fastest)
Build with python-runner: Build a docker image from python-runner. (easier to package and distribute)
Build your own docker image from scratch. Manually manage your code and dependencies (not detailed here).
Run with python-runner#
To start with our python-runner docker image is the fastest way to run you bot code in a container.
You can find this image on Docker Hub
This image embeds our Python module and is set up to install your code dependencies and run your bot code.
We will mount our code as a volume, and the image will manage dependencies and run our bot for us.
You just need to put your code in a directory named app.
You can put as may as file as you want, but your program will be launched using python3 main.py command.
If you need extra Python dependencies (other than the olvid-bot module) add a requirements.txt file next to you main.py.
Command pip3 install -r requirements.txt will run automatically on container start.
Here is an example of file structure:
bot-project
|── docker-compose.yaml
|── app
| |── main.py
| |── requirements.txt
And here is a docker-compose.yaml file example, embedding a daemon, your bot and a cli to configure your daemon if necessary.
services:
  daemon:
    image: olvid/bot-daemon
    environment:
      # TODO generate a random client key with `uuidgen` command and set it here and in the cli service
      - OLVID_ADMIN_CLIENT_KEY_CLI=SetARandomValue
    volumes:
      - ./data:/daemon/data
      - ./backups:/daemon/backups
    restart: unless-stopped

  bot:
    image: olvid/bot-python-runner
    environment:
      # TODO set OLVID_CLIENT_KEY with the client generated when creating identity on daemon
      - OLVID_CLIENT_KEY=SetMe
      - OLVID_DAEMON_TARGET=daemon:50051
    volumes:
      # you can remove :ro (read-only file system) if necessary (for example if you store files or database in working directory)
      - ./app:/app:ro
    restart: unless-stopped
    depends_on:
      - daemon

  cli:
    image: olvid/bot-python-runner
    environment:
      # TODO use the same value as in the daemon OLVID_ADMIN_CLIENT_KEY_CLI
      - OLVID_ADMIN_CLIENT_KEY=SetARandomValue
      - OLVID_DAEMON_TARGET=daemon:50051
    entrypoint: "olvid-cli"
    stdin_open: true
    tty: true
    # share a volume where you can put photos to set up identity profile photos
    volumes:
      - ./photos:/photos
    depends_on:
      - daemon
    # You may use a profile as the CLI only needs to be started manually
    profiles:
      - "cli"
Note
We do not need to expose daemon ports because every other services will connect to daemon inside docker network.
If this is the first time you launch your daemon you can use CLI to configure your daemon.
To launch CLI use:
docker compose run --rm -it cli
You will enter CLI interactive mode and you can now follow Initialize daemon procedure to create your bot identity, and retrieve it’s client key.
When you have your bot client key you can set it as OLVID_CLIENT_KEY value in bot service environment.
Create a directory named app and move your main.py and eventually your requirements.txt files inside.
You can now start your bot with:
docker compose up -d bot
If you need to check logs use:
docker compose logs -f daemon
# or
docker compose logs -f bot
Build with python-runner#
Building your own docker image allows you to push it to a registry, making it easy to deploy your bot on one or multiple remote machines.
Here is an example of a Dockerfile.
# build from our python-runner image (image version is the same as installed olvid-bot module)
FROM olvid/bot-python-runner:latest

# un-comment to install any python package you need
# RUN pip3 install python-package

COPY ./app /app
To build your image run:
docker build -t my-first-bot .
If you want to test your image locally you can use docker run command.
We suppose you have a listening daemon and an associated client key.
Mind to replace my-olvid-client-key and your_host_address with your client key, and your local ip address.
docker run --rm -e OlVID_CLIENT_KEY=my-olvid-client-key \
    -e OLVID_DAEMON_TARGET=your_host_address:50051 \
    --network host \
    my-first-bot
Setup TLS#
Added in version 1.0.1.
gRPC natively support TLS. We can distinguish two modes:
TLS Server authentication: The daemon starts with its own self-signed certificate and associated private key. Clients will use this certificate to encrypt communications with the daemon.
TLS with Client authentication: We create our own Certification Authority (CA) to create certificates. We will then create a certificate and a private key for the daemon and one per client. Like this, clients can encrypt communications with the daemon, and the daemon can verify that clients have been authorized to connect.
TLS Server authentication#
Generating Server Certificate and Private Key using OpenSSL#
Warning
Important: Replace localhost with your daemon’s hostname. The hostname is the IP address or domain name that clients will use to establish a connection with the daemon.
openssl req -x509 -newkey rsa:4096 -keyout server.key \
    -days 36500 -out server.pem -nodes -subj '/CN=localhost'
Here is a rewritten version with corrected English and improved clarity:
Set up daemon#
Pass certificate and private key to daemon using environment variables:
DAEMON_CERTIFICATE_FILEDAEMON_KEY_FILE
If you use docker, create a credentials directory, containing previously generated certificate and key. Add this directory as a read-only volume and use environment variable to enable simple TLS in daemon.
If you are using Docker, create a credentials directory containing the previously generated certificate and key. Mount this directory as a read-only volume and utilize environment variables to enable TLS server authentication in the daemon.
daemon:
  image: olvid/bot-daemon:latest
  environment:
    - OLVID_ADMIN_CLIENT_KEY_CLI=ToSet
    - DAEMON_CERTIFICATE_FILE=./credentials/server.pem
    - DAEMON_KEY_FILE=./credentials/server.key
  ports:
    - 50051:50051
  restart: unless-stopped
  volumes:
    - ./data:/daemon/data
    - ./backups:/daemon/backups
    - ./credentials:/daemon/credentials:ro
Setting up bot#
To ensure communication encryption, your bot needs the daemon certificate.
Let’s assume you have a credentials directory containing the previously generated server.pem file.
If you’re running in a Docker environment, you can mount this directory as a read-only volume.
Using environment (for docker containers)
Set up environment variables.
export OLVID_SERVER_CERTIFICATE_PATH=./credentials/server.pem
Now OlvidClient sub-classes will automatically enable TLS server authentication on start.
import asyncio
from olvid import OlvidClient

async def main():
    # Implicit configuration, this automatically load configuration from environment
    client = OlvidClient()
    print(await client.identity_get())
Using Files (for dev environment only)
OlvidClient can search for specific file names to load TLS configurations. For a persistent TLS configuration (compared to using environment variables), you can create symlinks or copy files to specific locations.
ln -s ./credentials/server.pem .server.pem
Now OlvidClient sub-classes will automatically enable TLS server authentication on start.
import asyncio
from olvid import OlvidClient

async def main():
    # Implicit configuration, this automatically load configuration from environment or .server.pem file
    client = OlvidClient()
    print(await client.identity_get())
Using Code
Create a GrpcSimpleTlsConfiguration object and pass it as tls_configuration parameter to an OlvidClient subclass constructor.
import asyncio
from olvid import OlvidClient

async def main():
    client = OlvidClient(tls_configuration=OlvidClient.GrpcSimpleTlsConfiguration(
            server_certificate_path="./credentials/server.pem"
    ))
    print(await client.identity_get())

        asyncio.set_event_loop(asyncio.new_event_loop())
        asyncio.get_event_loop().run_until_complete(main())
TLS with Client authentication#
Generating Certificates#
We recommend that you create a credentials directory and moved in to run every following commands.
Note
To generate CA and server certificate you will need these two openssl templates, download or create them in your current working directory.
Generate our local Certification Authority (CA)
# You can leave input default values
openssl req -x509 -new -newkey rsa:2048 -nodes -keyout ca.key -out ca.pem \
  -config ca-openssl.cnf -days 36500 -extensions v3_req
Generate server certificate and key.
Warning
Important: Replace localhost with your daemon’s hostname. The hostname is the IP address or domain name that clients will use to establish a connection with the daemon.
# generate server private key
openssl genpkey -algorithm RSA -pkeyopt rsa_keygen_bits:2048 -out server.key
# generate server certificate
openssl req -new -key server.key -out server.csr -config server-openssl.cnf \
    -subj '/CN=localhost'
openssl x509 -req -CA ca.pem -CAkey ca.key -CAcreateserial -in server.csr \
  -out server.pem -extensions v3_req -extfile server-openssl.cnf -days 36500
Generate client certificate and key
# generate client key
openssl genpkey -algorithm RSA -pkeyopt rsa_keygen_bits:2048 -out client.key

# generate client certificate request (you can leave default value)
openssl req -new -key client.key -out client.csr
# set common name to whatever you want that will identify client
openssl x509 -req -CA ca.pem -CAkey ca.key -CAcreateserial -in client.csr \
  -out client.pem -days 36500
Set up daemon#
Daemon will need its certificate, its private key, and the CA to check client are allowed to connect. We will use three environment variables to specify file paths:
DAEMON_CERTIFICATE_FILEDAEMON_KEY_FILEDAEMON_ROOT_CERTIFICATE_FILE
Create a credentials directory, ca.pem, server.pem and server.key files.
Add this credentials directory as a read-only volume and use environment variable to enable TLS with client authentication in daemon.
daemon:
  image: olvid/bot-daemon
  environment:
    - OLVID_ADMIN_CLIENT_KEY_CLI=ToSet
    - DAEMON_CERTIFICATE_FILE=./credentials/server.pem
    - DAEMON_KEY_FILE=./credentials/server.key
    - DAEMON_ROOT_CERTIFICATE_FILE=./credentials/ca.pem
  ports:
    - 50051:50051
  restart: unless-stopped
  volumes:
    - ./data:/daemon/data
    - ./backups:/daemon/backups
    - ./credentials:/daemon/credentials:ro
Setting up bot#
Your bots will need a valid certificate and private key pair, and the CA certificate.
If you followed Generating Certificates section you will need client.pem, client.key and ca.pem files.
If you are in docker you can mount credentials directory as a read-only volume.
Using environment (for docker containers)
Set up three environment variables.
export OLVID_ROOT_CERTIFICATE_PATH=./credientials/ca.pem
export OLVID_CERTIFICATE_CHAIN_PATH=./credientials/client.pem
export OLVID_PRIVATE_KEY_PATH=./credientials/client.key
Using files (for development environment)
On start OlvidClient can look for some specific files names to load a tls configuration. To have a persistent TLS configuration (compared to environment), you can create symlinks or copy files to specific locations.
ln -s ./credentials/ca.pem .ca.pem
ln -s ./credentials/client.pem .client.pem
ln -s ./credentials/client.key .client.key
Using Code
Create a GrpcMutualAuthTlsConfiguration object and pass it as tls_configuration parameter to an OlvidClient subclass constructor.
import asyncio
from olvid import OlvidClient

async def main():
    client = OlvidClient(tls_configuration=OlvidClient.GrpcMutualAuthTlsConfiguration(
            root_certificate_path="./credentials/ca.pem",
            certificate_chain_path="./credentials/client.pem",
            private_key_path="./credentials/client.key"
    ))
    print(await client.identity_get())

asyncio.set_event_loop(asyncio.new_event_loop())
        asyncio.get_event_loop().run_until_complete(main())
Backups#
In your projects, the daemon is a central element and it’s where the data are stored. In reality, the data you manipulate (identities, messages, …) is only a tiny part of the data that the daemon manage. It’s this invisible data that needs to be saved, as it enables secure exchange with the bot’s contacts.
Warnings#
Danger
Please carefully review the following recommendations and warnings before continuing.
Backups contain sensitive data equivalent to the daemon’s data directory. It is imperative to handle them with the same rigor and level of security.
Backups mentioned here are Olvid backups, which do not contain messages or attachments. These backups allow you to restore your contact book and groups, but not the discussion content.
Backups are … backups. You will have to save them in a safe place to be able to re-use them if necessary. In a production environment, the minimal best practice would be to store backups on a separate disk from the rest of the system.
Restoring a backup on another daemon and running both simultaneously will lead to unpredictable behavior.
Setup automatic backups#
Daemon automatically and periodically creates backup. Backups are created every time it’s necessary (your bot added a contact, joined or left a group, …).
These backups are stored in /daemon/backups directory.
If you want to persist these backups you need to mount the /daemon/backups directory as a volume. Here is an example in a docker-compose.yaml file.
services:
  daemon:
    image: olvid/bot-daemon
    volumes:
      - ./data:/daemon/data
      - ./backups:/daemon/backups
Here is an example of /daemon/backups directory tree.
| backups
|  | 0001
|  |  | backup-1041588600.bytes
|  |  | backup-1569233400.bytes
|  |  | backup_seed.txt
Each subdirectory (0001, 0002) must contains it’s own backup_seed.txt file daemon will increment and create a new directory.
This backup seed is necessary to decrypt and restore backups, without the seed your backup is unusable.
Inside a subdirectory the daemon create and stores up to 10 backup files before rotating them. All these backups are named with their creation epoch timestamp.
Restore a backup#
Danger
Restoring a backup is not a trivial action and should only be done as a last resort. You will lose all your stored messages and attachments in the daemon during this process. Only elements saved using the storage API will still be available.
To restore a backup you will need a fresh daemon installation.
If you want to reset an existing daemon delete the data folder content (this data is probably mounted as a volume on host system).
Daemon will also need to access backup files, so we will need another volume.
services:
  daemon:
    image: olvid/bot-daemon
    volumes:
      # data directory must be empty
      - ./data:/daemon/data
      # mount your backups directory to let daemon use them
      - ./backups:/daemon/backups
Then choose the backup to restore in your backups (it’s most of the time the most recent). Save the subdirectory and backup file name for later.
Now we will need to start daemon in a recovery mode and tell him to restore our backup.
There are two solutions, we can use docker compose or docker run.
docker compose
With docker compose you can reuse your current docker-compose.yaml file by verifying beforehand that:
The data volume has been properly cleared.
Backup directory has been mounted to /daemon/backups.
All other running services have been stopped using the command docker-compose down.
Then you can start backup restoration with the following command. Do not forget to replace the backup subdirectory (0001) and filename (backup-1569233400.bytes) with your own values.
docker compose run --rm daemon \
    -r backups/0001/backup-1569233400.bytes | grep Backup
docker run
First check that your original daemon is not running and the data directory you will mount is empty.
Here is an example of docker run command to adapt to your situation.
Mind to check the volume location on host system, daemon image version, your backup subdirectory and file name.
docker run --rm \
    -v ./data:/daemon/data \
    -v ./backups:/daemon/backups \
    olvid/bot-daemon -r backups/0001/backup-1569233400.bytes | grep Backup
When you see the message 💾 BackupRestoration: Finished backup restoration process, you can stop the daemon (CTRL + C) and start it normally with the command docker-compose up -d.
You can now verify using the CLI that the restoration was successful. You should find your identities, contacts, groups, client keys, …
