
👩🏫 Tutorials#
Deploy in Production#
Before deploying a bot or a program in production, we strongly advise you to read and consider the following points.
Danger
Keep absolutely the following points in mind.
The daemon and its data are extremely sensitive. They have access to all messages, attachments, and more. It is your responsibility to ensure that this data is properly hosted and protected.
The traffic between the daemon and its clients is not encrypted by default (see Tls Encryption). Therefore, it should never be exposed to untrusted networks.
Without TLS encryption, client keys are only useful for separating API calls and cannot be used for authentication purposes.
Create a Keycloak bot#
Note
This section is intended for people who have deployed the Olvid directory plugin for Keycloak 😬. If you don’t know what this is, click 👉️ here 👈️ to learn more about this feature.
Configure a Keycloak Bot#
Configuring a Keycloak Bot allows you to manage it as one of your standard Keycloak users. It can be added or removed from groups, and users can interact with the bot via the “Directory” tab in their application. This greatly simplifies its integration and large-scale use.
The following steps require access to your Keycloak’s Olvid management console.
Activate the bots in Keycloak#
Tip
This step is only necessary for your first bot.
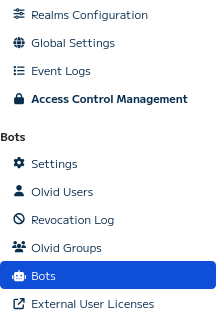
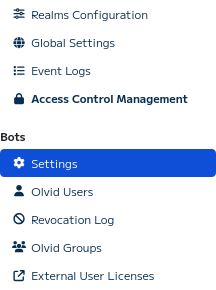
For your realm, if you do not see the “Bots” button in the left sidebar, click on the “Settings” button of your realm.
Button Bot
Realm Settings Button
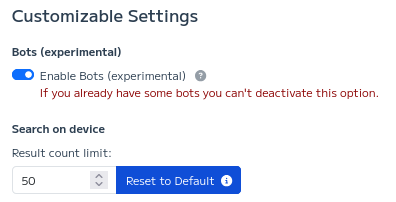
Then, in your realm settings, enable the option “Enable Bots”.
Enable Bots
Create a new Keycloak Bot#
Access the “Bots” page of your Realm. The button is located in the left side panel.
Button Bots
When you are on the bot management page, click on the “Create a bot” button at the top left.
Bots management page

This will display a form to fill out with the username and identity details of your new bot.
Form for bot creation

When you have submitted the form, a configuration link (beginning with https://configuration.olvid.io/#) will be displayed. Save this link for the following steps.
Tip
If you have lost your configuration link, you can reset it with the “Refresh” button in bots list
Create the bot identity#
When you have the configuration link, you will need to use the CLI. Click here if you don’t remember how to use it.
Create a new Keycloak identity
Start the CLI and create your new identity using the configuration link. It will automatically generate a client key to be passed to your future bot.
# create keycloak identity
0 > identity kc new https://configuration.olvid.io/#AAAAAAAAA.....
# client is automatically created
identity creation > Here is your client key to connect to daemon with this identity: 00000000-0000-0000-0000-000000000000
Note
All Keycloak users can now discover and interact with your bot via their “Directory” button in the Olvid application.
You can also manage your bot from the administration console!
SSL Configuration#
Added in version 1.4.1.
Daemon configuration#
Here is an example of nginx configuration to set up a daemon behind an HTTP reverse proxy. You can then install a letsencrypt certificate using the certbot command in order to use the HTTPS protocol.
server {
  server_name daemon.example.com;
  listen 80 http2;
  listen [::]:80 http2;

  access_log /var/log/nginx/bot-access.log;
  error_log /var/log/nginx/bot-error.log;

  location / {
    grpc_pass grpc://localhost:50050;
    grpc_pass_header daemon-client-key;
    grpc_pass_header daemon-identity-id;
  }
}
Download configuration file here: grpc-reverse-proxy.conf
Important
If the daemon also uses TLS encryption, replace grpc:// with grpcs:// in the gprc_pass directive.
Python Client configuration#
To connect to a daemon using https, simply use the prefix https:// in the value of the environment variable OLVID_DAEMON_URL.
JavaScript client configuration#
To connect to a daemon using https, simply use the prefix https:// in the value of the environment variable OLVID_DAEMON_URL.
TLS Configuration#
Added in version 1.0.1.
Natively, gRPC supports TLS encryption. We can distinguish two modes:
Authentification serveur: The daemon uses its own self-signed certificate and associated private key. Clients will use this certificate to encrypt communications with the daemon.
Authentification client : We create our own Certificate Authority (CA). This allows us to create a certificate and private key for the daemon and one per client. Thus, clients can encrypt communications with the daemon, and the daemon can verify that clients have been authorized to connect.
Server Authentication#
Daemon configuration#
In a first step, we generate the server certificate and private key using the openssl command.
Important
Replace localhost with your daemon’s hostname. The hostname is the IP address or domain name that clients will use to establish a connection with the daemon.
openssl req -x509 -newkey rsa:4096 -keyout server.key \
    -days 36500 -out server.pem -nodes -subj '/CN=localhost'
If you are using Docker, create a credentials directory containing the previously generated certificate and key. Add this directory as a read-only volume and use an environment variable to enable simple TLS authentication in the daemon.
We use the following environment variables to configure the daemon:
DAEMON_CERTIFICATE_FILEDAEMON_KEY_FILE
This gives us a docker-compose.yaml file similar to this one.
daemon:
  image: olvid/bot-daemon::2.0.1
  environment:
    - OLVID_ADMIN_CLIENT_KEY_CLI=ToSet
    - DAEMON_CERTIFICATE_FILE=./credentials/server.pem
    - DAEMON_KEY_FILE=./credentials/server.key
  ports:
    - 50051:50051
  restart: unless-stopped
  volumes:
    - ./data:/daemon/data
    - ./backups:/daemon/backups
    - ./credentials:/daemon/credentials:ro
Python Client configuration#
To ensure communications encryption, your bot needs daemon’s certificate.
It is assumed that you have a credentials directory containing the server.pem file generated previously. There are several ways to make your client use this file to authenticate the daemon and encrypt traffic.
Environnement
Configure the environment variable in your docker-compose.yaml file, in your docker command or your local environment.
OLVID_SERVER_CERTIFICATE_PATH=./credentials/server.pem
Any subclass of the OlvidClient class will automatically load the TLS configuration.
Files
At startup, subclasses of the OlvidClient class look for specific filenames to load TLS configurations. If a file named *.server.pem exists, it will be automatically used to configure TLS.
ln -s ./credentials/server.pem .server.pem
Code
You can also manually configure the certificates and keys to be used in your Python code.
In this case, you need to create a GrpcSimpleTlsConfiguration object and pass it as tls_configuration when creating the client.
import asyncio
from olvid import OlvidClient

async def main():
    client = OlvidClient(tls_configuration=OlvidClient.GrpcSimpleTlsConfiguration(
            server_certificate_path="./credentials/server.pem"
    ))
    print(await client.identity_get())

asyncio.set_event_loop(asyncio.get_event_loop())
asyncio.get_event_loop().run_until_complete(main())
JavaScript client configuration#
Currently, our implementation of JavaScript does not natively support the use of the TLS protocol.
Client authentication#
Generation of Certificates#
We recommend that you create a credentials directory and run the following commands from it.
Note
To generate the CA and server certificate, you will need these two OpenSSL templates. Download them or create them in your current working directory.
Generation of our local Certificate Authority (CA)
# you can leave default values
openssl req -x509 -new -newkey rsa:2048 -nodes -keyout ca.key -out ca.pem \
  -config ca-openssl.cnf -days 36500 -extensions v3_req
Generation of the server certificate and key.
Replace localhost with your daemon’s hostname. The hostname corresponds to the IP address or domain name that clients will use to establish a connection with the daemon.
# generate server private key
openssl genpkey -algorithm RSA -pkeyopt rsa_keygen_bits:2048 -out server.key
# generate server certificate
openssl req -new -key server.key -out server.csr -config server-openssl.cnf \
    -subj '/CN=localhost'
openssl x509 -req -CA ca.pem -CAkey ca.key -CAcreateserial -in server.csr \
  -out server.pem -extensions v3_req -extfile server-openssl.cnf -days 36500
Generation of a certificate and private key for a client
# generate client private key
openssl genpkey -algorithm RSA -pkeyopt rsa_keygen_bits:2048 -out client.key

# generate client certificate request (leave default values)
openssl req -new -key client.key -out client.csr
openssl x509 -req -CA ca.pem -CAkey ca.key -CAcreateserial -in client.csr \
  -out client.pem -days 36500
Daemon configuration#
The daemon will need its certificate, its private key and the CA to verify that clients are authorized to connect. We will use three environment variables to specify the paths of the corresponding files:
DAEMON_CERTIFICATE_FILEDAEMON_KEY_FILEDAEMON_ROOT_CERTIFICATE_FILE
Create a directory called credentials and copy the previously generated files into it.
This gives us a docker-compose.yaml file similar to this one.
daemon:
  image: olvid/bot-daemon:2.0.1
  environment:
    - OLVID_ADMIN_CLIENT_KEY_CLI=ToSet
    - DAEMON_CERTIFICATE_FILE=./credentials/server.pem
    - DAEMON_KEY_FILE=./credentials/server.key
    - DAEMON_ROOT_CERTIFICATE_FILE=./credentials/ca.pem
  ports:
    - 50051:50051
  restart: unless-stopped
  volumes:
    - ./data:/daemon/data
    - ./backups:/daemon/backups
    - ./credentials:/daemon/credentials:ro
Python Client configuration#
To configure the client, you can use one of the following methods:
Environnement
Configure the following environment variables in your docker-compose.yaml file, in your docker command or your local environment.
OLVID_CLIENT_TLS_CERTIFICATE_FILE=./credentials/client.pem
OLVID_CLIENT_TLS_KEY_FILE=./credentials/client.key
OLVID_CLIENT_TLS_CA_FILE=./credentials/ca.pem
Any subclass of the OlvidClient class will automatically load the TLS configuration.
Files
At startup, the subclasses of the OlvidClient class look for specific filenames to load TLS configurations. If it finds the following three files, they will be automatically used to configure TLS.
.ca.pem
.client.pem
.client.key
ln -s ./credentials/ca.pem .ca.pem
ln -s ./credentials/client.pem .client.pem
ln -s ./credentials/client.key .client.key
Code
You can also manually configure the certificates and keys to be used in your Python code. In this case, you need to create a GrpcMutualAuthTlsConfiguration object and pass it as the tls_configuration parameter to the constructor of an OlvidClient subclass.
import asyncio
from olvid import OlvidClient

async def main():
    client = OlvidClient(tls_configuration=OlvidClient.GrpcMutualAuthTlsConfiguration(
            root_certificate_path="/path/to/ca.pem",
            certificate_chain_path="/path/to/client.pem",
            private_key_path="/path/to/client.key"
    ))
    print(await client.identity_get())

asyncio.set_event_loop(asyncio.new_event_loop())
asyncio.get_event_loop().run_until_complete(main())
JavaScript client configuration#
Currently, our implementation of JavaScript does not natively support the use of the TLS protocol.
Backups#
In your projects, the daemon is a central element, it’s where all data is stored. In reality, the data you manipulate (identities, messages, …) only make up a small part of the data managed by the daemon. It’s these invisible data that must be backed up, as they allow for secure exchange with bot contacts.
Warnings#
Danger
Please carefully review the following recommendations and warnings before proceeding.
Backups contain sensitive data equivalent to the daemon’s data directory. It is imperative to handle them with the same rigor and level of security.
The backups mentioned here are Olvid backups, which do not contain messages or attachments. These backups allow you to restore your address book, groups, and storage, but not the content of discussions (messages and attachments).
Backups are… backups. You will need to keep them in a safe place so you can reuse them if necessary.
Restoring a backup on another daemon and running it simultaneously on the old instance will result in unpredictable behavior.
Automatic Backups Configuration#
The daemon automatically creates backups whenever necessary (your bot has added a contact, joined or left a group, …). These backups are stored on an Olvid server and can be accessed using a key. This key can be obtained using the CLI command backup key get.
The backup key is also stored in the /daemon/backups directory. You can access the file by mounting the /daemon/backups directory as a volume. Here is an example of a docker-compose.yaml file.
services:
  daemon:
    image: olvid/bot-daemon:2.0.1
    volumes:
      - ./data:/daemon/data
      - ./backups:/daemon/backups
Verification of a backup#
To validate backups are working properly, you can access your backup content using the CLI and the command backup get $BACKUP_KEY, replacing $BACKUP_KEY with your backup key.
Restoring a backup#
Danger
Restoring a backup is not a trivial action and should only be performed as a last resort. You will lose all your messages and attachments stored in the daemon during this process. Only items saved using the storage API, client keys, and settings will still be restored.
A classic backup restoration procedure should be done as follows.
Ensure that the original daemon is no longer running
In a new installation, run the following CLI command:
backup restore daemon $BACKUP_KEY.Validate identity restoration using the CLI command:
identity get
Useful Commands#
Here is a non-exhaustive list of CLI commands related to backups.
backup key get: display the current backup key.backup now: force the launch of a backup.backup get $BACKUP_KEY: displays the content of a backupbackup restore daemon $BACKUP_KEY: restore a backup to its latest state in full.backup restore admin $BACKUP_KEY: restores admin client keys and associated storage.backup restore admin $BACKUP_KEY $SNAPHOST_ID: restores a particular identity to a given snapshot (contact, groups, storage, client keys, settings). The snapshot IDs are available in the backup descriptions.
JVM Configuration#
Added in version 1.0.1.
It is possible to pass arbitrary options to the JVM running your daemon. To do this, you can use the environment variable JAVA_FLAGS.
Proxy Configuration#
To allow the daemon to use an HTTP proxy, specific parameters must be passed to the JVM. (cf: Proxy Properties).
Here is a possible example of configuration to use a fictional proxy accessible as proxy.example.com on port 8000, using a login and password. This configuration can be adapted to your needs.
JAVA_FLAGS=-Dhttps.proxyHost=proxy.example.com -Dhttps.proxyPort=8000 -Dhttp.proxyUser=username -Dhttp.proxyPassword=password