
💬 Olvid#
Installation#
Note
In the following section, you will deploy an Olvid daemon and an N8N instance using Docker and Docker Compose.
If you wish to use an existing daemon and/or N8N instance, you can deploy only a subset of the following services. You will just need to correctly fill in the Client Key and Daemon Url fields when creating credentials in N8N.
Installation of a Daemon and an Instance of N8N#
To get started, create a new folder for your project. This will be your current directory going forward.
mkdir olvid-n8n
cd olvid-n8n
You will then need to generate an administrator client key. You can use the
uuidgenoropensslcommands depending on your configuration. The result should be stored in a.envfile.echo "OLVID_ADMIN_CLIENT_KEY=$(uuidgen)" >> .env
OR
echo "OLVID_ADMIN_CLIENT_KEY=$(openssl rand -hex 32)" >> .env
You can now create a
docker-compose.yamlfile with the following content.
 x-logging: &default-logging
   logging:
     driver: "json-file"
     options:
       max-size: "1m"
       max-file: "100"

 services:
   ##########
   # DAEMON #
   ##########
   daemon:
     image: olvid/bot-daemon:2.0.1
     environment:
       - OLVID_ADMIN_CLIENT_KEY_CLI=${OLVID_ADMIN_CLIENT_KEY}
     restart: unless-stopped
     volumes:
       - ./data:/daemon/data
       - ./backups:/daemon/backups
     <<: *default-logging

   cli:
     image: olvid/bot-python-runner:2.0.1
     environment:
       - OLVID_ADMIN_CLIENT_KEY=${OLVID_ADMIN_CLIENT_KEY}
       - OLVID_DAEMON_URL=http://daemon:50051
     stdin_open: true
     tty: true
     entrypoint: "olvid-cli"
     volumes:
       - ./photos:/photos
     depends_on:
       - daemon
     # We use a profile cause cli only need to start on user initiative
     profiles:
       - "cli"
     <<: *default-logging

   #######
   # N8N #
   #######
   n8n:
     image: docker.n8n.io/n8nio/n8n
     restart: always
     ports:
       - "5678:5678"
     environment:
       - N8N_DIAGNOSTICS_ENABLED=false
       - N8N_PUBLIC_API_DISABLED=true
       - N8N_PUBLIC_API_SWAGGERUI_DISABLED=true
       - NODES_EXCLUDE=["n8n-nodes-base.executeCommand","n8n-nodes-base.readWriteFile"]
       - N8N_REINSTALL_MISSING_PACKAGES=true
     volumes:
       - ./n8n_data:/home/node/.n8n
Create the containers with the following command.
docker compose up -d daemon n8n
Install the Olvid node in N8N#
You have launched an Olvid daemon and a N8N instance that are running in the background, now it’s time to configure N8N and install the community Olvid nodes.
Open the page
http://localhost:5678in your browser to access your N8N instance.Create an N8N account (this is a local account).
Go to the settings page
Click on
Community Nodes, then click onInstall a community node.
Enter
n8n-nodes-olvidinstead of npm Package Name, take the time to consider the risks of installing a community node before checking the box and clicking onInstall.
Return to the main page to create your first workflow.
The Olvid node should now be available in your workflows.

Configure the Olvid node#
Now that you have installed the Olvid node, before using it, you need to create some credentials so that it can communicate with your daemon.
Open or create a workflow and add an Olvid node to it.
You can independently choose an action or a trigger.

Open your node and create the credentials by clicking on
Select Credential.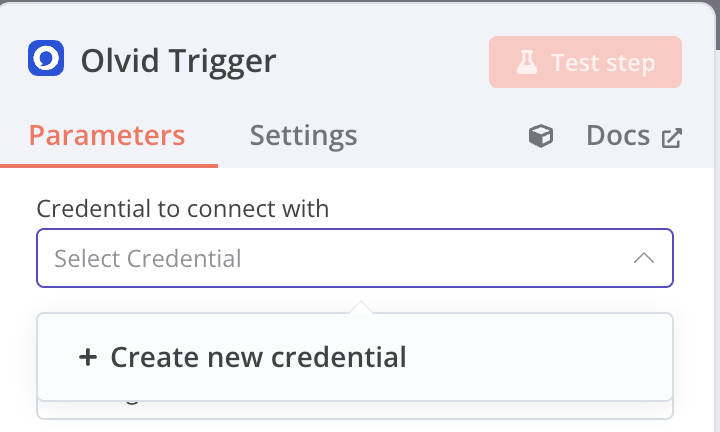
You now need to create an Olvid client key to allow your node to communicate with the Olvid daemon. To do this, you can use the following commands in a terminal, in the folder containing your
docker-compose.yamlfile.Prototype: identity new FirstName LastName Position Company
docker compose run --rm cli identity new Totoro
This command will return an integer which is the identifier of the identity you just created. For the next commands, we will consider this identifier to be 1.
You now need to create an API key for this new identity using the following command.
Prototype: key new KeyName IdentityId
docker compose run --rm cli key new totoro-n8n-key 1
This command returns a key in the following form:
AAAAAAAA-BBBB-CCCC-DDDD-EEEEEEEEEEEE.Copy this key and paste it in the
Client Keyfield of your Credentials creation modal in N8N.Enter the value for the
Daemon Urlfield to set it ashttp://daemon:50051(if n8n was created in the same docker-compose.yaml file, otherwise enter the URL that allows you to reach your daemon).You can now save your credentials with the Save button.
Congratulations 🎉!
You can now use Olvid nodes in your workflows!